How to Install Python on Windows
How to Install Python on Windows

Python doesn’t come prepackaged with Windows, but that doesn’t mean Windows users won’t find the flexible programming language useful. It’s not quite a simple as installing the newest version however, so let’s make sure you get the right tools for the task at hand.
First released in 1991, Python is a popular high-level programming language used for general purpose programming. Thanks to a design philosophy that emphasizes readability it has long been a favorite of hobby coders and serious programmers alike. Not only is it an easy language (comparatively speaking, that is) to pick up but you’ll find thousands of projects online that require you have Python installed to use the program.
Which Version Do You Need?
Unfortunately, there was a significant update to Python several years ago that created a big split between Python versions. This can make things a bit confusing to newcomers, but don’t worry. We’ll walk you through installing both major versionsWhen you visit the Python for Windows download page, you’ll immediately see the division. Right at the top, square and center, the repository asks if you want the latest release of Python 2 or Python 3 (2.7.13 and 3.6.1, respectively, as of this tutorial).

Newer is better, right? Maybe so, maybe not. The version you want depends on your end goal. Let’s say, for example, that you read our article about expanding your Minecraft world with MCDungeon and are excited to add cool stuff to your worlds. That project is coded in Python and requires Python 2.7—you can’t run the MCDungeon project with Python 3.6. In fact, if you’re exploring hobby projects like MCDungeon, you’ll find that nearly all of them use 2.7. If your goal is to get some project that ends in a “.py” extension up and running, then there’s a very, very good chance you’ll need 2.7 for it.

On the other hand, if you’re looking to actually learn Python, we recommend installing both versions side by side (which you can do with zero risk and only a tiny bit of setup hassle). This lets you work with the newest version of the language, but also run older Python scripts (and test backwards compatibility for newer projects). Comparing the two versions is an article unto itself, though, so we’ll defer to the Python project wiki where you can read their well written overview of the differences.
You can download just Python 2 or Python 3 if you’re sure you only need a particular version. We’re going the distance today and will be installing both of them, so we recommend you download both versions and do the same. Under the main entry for both versions you’ll see an “x86-64” installer, as seen below.

This installer will install the appropriate 32-bit or 64-bit version on your computer automatically (here’s some further reading if you want to know more about the differences between the two).

How to Install Python 2
Installing Python 2 is a snap, and unlike in years past, the installer will even set the path variable for you (something we’ll be getting into a bit later). Run the installer, select “Install for all users,” and then click “Next.”
On the directory selection screen, leave the directory as “Python27” and click “Next.”

On the customization screen, scroll down, click “Add python.exe to Path,” and then select “Will be installed on local hard drive.” When you’re done, click “Next.”

You don’t have to make any more decisions after this point. Just click through the wizard to complete the installation. When the installation is finished, you can confirm the installation by opening up Command Prompt and typing the following command:
python -V

Success! If all you need is Python 2.7 for some project or another, you can stop right here. It’s installed, the path variable is set, and you’re off to the races.
How to Install Python 3
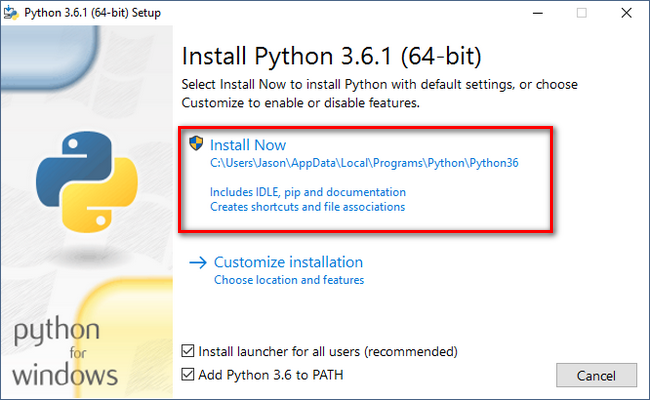
If you want to learn the newest version of Python, you’ll need to install Python 3. You can install it alongside Python 2.7 with no problems, so go ahead and run the executable now.On the first screen, enable the “Add Python 3.6 to PATH” option and then click “Install Now.”
Next, you have a decision to make. Clicking the “Disable path length limit” option removes the limitation on the MAX_PATH variable. This change won’t break anything, but will allow Python to use long path names. Since many Python programmers are working in Linux and other *nix systems where path name length isn’t an issue, turning this on in advance can help smooth over any path-related issues you might have while working in Windows.
We recommend go ahead and selecting this option. If you know you don’t want to disable the path length limit, you can just click “Close” to finish the installation. And, if you want to read more about the issue before committing to the change, read up here.


If you’re only installing Python 3, you can use the same command line trick of typing
python -v
that we used above to check that it is installed correctly and the path
variable is set. If you’re installing both versions, however, you need
to make the quick tweak found in the following section.Adjust System Variables So You Can Access Both Python Versions From the Command Line
This section of the tutorial is completely optional, but will allow you to quickly access both versions of Python from the command line. After installing both versions of Python, you may have noticed a little quirk. Even though we enabled the system path for both Python installations, typing “python” at the command prompt only points you to Python 2.7.The reason for this is simple: the variable (whether automatically adjusted by an installer or manually tweaked) simply points at a directory, and every executable in that directory becomes a command line command. If there are two directories listed and both have a “python.exe” file in them, whichever directory is higher in the list of variables gets used. And, if there is a variable set for the system and the user, the system path takes precedence over the user path.
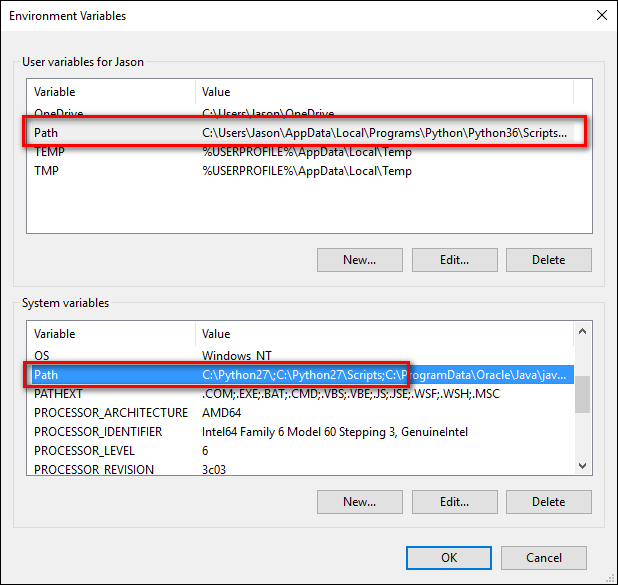
The latter is exactly what’s happening in this case: the Python 2 installer edited the system wide variable and the Python 3 installer added a user level variable—and we can confirm this by looking at the Windows’ environment variables.
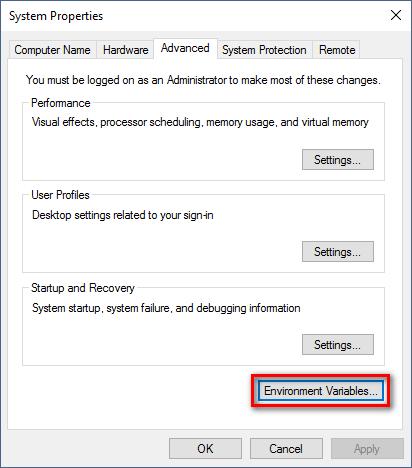
Hit Start, type “advanced system settings,” and then select the “View advanced system settings” option. In the “System Properties” window that opens, on the “Advanced” tab, click the “Environment Variables” button.
Here, you can see Python 3 listed in the “User variables” section and Python 2 listed in the “System variables” section.
There are a few ways you can remedy this situation. The simplest (albeit the one with the least functionality) is to just remove the entry for the version of Python you plan on using the least. While that’s simple, it’s also not very much fun. Instead we can make another change that will give us access to “python” for Python 2 and “python3” for Python 3.
To do this, fire up File Manager and head to the folder where you installed Python 3 (
C:\Users\[username]\AppData\Local\Programs\Python\Python36 by default). Make a copy of the “python.exe” file, and rename that copy (not the original) to “python3.exe”.
Open a new command prompt (the environmental variables refresh with each new command prompt you open), and type “python3 –version”.

Boom! You can now use the “python” command at the Command Prompt when you want to use Python 2.7 and the “python3” command when you want to use Python 3.
If, for whatever reason, you don’t find this a satisfactory solution, you can always reorder the environmental variables. Be sure to brush up with our tutorial first if you’re not comfortable editing those variables.

Please note, however, that regardless of which method you use it is important to leave the original python.exe intact as the applications in the /scripts/ subdirectory for both versions of Python rely on that filename and will fail if it is missing.
After a little installing and a little tweaking, you have both versions installed and you’re ready for whatever Python project you want to tackle.


Comments
Post a Comment